E-Ink Clock: E-Ink Display
Fortunately there are two excellent sources about using the ED060SC4. Essential Scrap describes the basics of the hardware used to create such a display and has documentation about the waveforms required to drive his display. While this source is very helpful to understand the basics of E-Ink displays I was not able to successfully control mine using his waveforms.
Sprite_tm had the same issue and noticed that there are at least two different types of this display: One with LB060SC4 and one with ED060SC4 as part number which, at least in theory, should be equivalent. Since I have a display with the second part number I used the waveforms implemented by Sprite_tm . Note that this repository is not the original source code, but a mirror by Oliv with minor adjustments.
The connections I use are the same that Sprite_tm is using and you can find them in detail in the hardware section of this page.
Basic Logic
First the display has to be started and put into draw mode. Next, to start a new image the frame has to be started. Each line is drawn by beginning the line, shifting in the line data and finally ending the line. If you have to do calculations on the fly you can do them after ending and before beginning the lines. If the calculations are done at this place no colors are bleeding to neighboring pixels.
If I did not write a timing to a wave, you can assume it to be 1 µs.
Turn On/Off
Turning on the display is simple, but one has to be sure to obey the timings from the datasheet. To turn the display off just reverse this waveform. Important: Be sure that no input pin is pulled to high while DON is pulled to low. It seems that this can destroy the display.
Enable Draw Mode
Not much to say here.
Begin Frame
This resets the internal state of the display in such a way that you can start drawing a new frame. A frame consists of 600 lines. Also note that one has to advance three lines to begin drawing at the first line. This can be seen in the waveform at the end.
Line
First you have to begin the line by pulling DOE to high and DSPH to low.
If you do calculations or otherwise delay the program after beginning a line pixels will bleed into the rows and destroy the displayed image. Therefore I suggest to do all calculations before beginning a line.
Now you have to shift the line data, i.e., 800 pixels, into the shift register:
One such operation shifts the value of four consecutive pixels (4 times 2 bits) into the register. Therefore you have to do this 200 times. The value binary 10 draws white, while 01 draws black. The two other values, 00 and 11, do nothing.
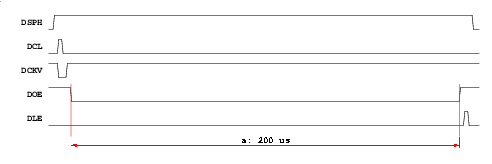
Finally you have to finish the line:
The hold time of 200 µs is an educated guess and you will have to test which value works best for your use-case. This is a tradeoff of load imbalance on the power supply, which might lead to coil whine or additional stress on some components, and bleeding of the image.
Finally, you can finish the line, i.e., set DOE to low, and do some calculations for the next line. After that start the next line. If your calculations are reasonably fast, there is no need to pull DOE low during the calculation time, which might be desired in order to avoid coil whine or unnecessary stress on the power supply.


